Wednesday, July 12, 2017

Faux Stain Finish

I mentioned yesterday that I would show you how I did the faux stain finish on my "Farmhouse Grunge" chest of drawers.
 

I usually strip and sand to get to the raw wood and refinish. I had been using paint to stain smaller craft project pieces and it worked so well that I wanted to try it on the top of this chest of drawers.
 

I used the same dry brushing technique that I did on the rest of the piece. I started with a brown oops paint that I made into chalky paint.


I added very light feather strokes of grays and whites, alternating light and dark colors.

 
When I got the paint the way I wanted it, I then applied Fiddes Jaccobean Wax. I love this wax. I added a little bit of Mineral Spirits to thin it and rubbed it on with a gloved hand. Wiped off excess and buffed. So easy.

I make signs and often use this same faux stain technique. It is a great alternative to stain if I am in a hurry or can't get outside and don't want to smell the fumes from stain. It dries so much faster than stain, especially using the dry brushing technique.


                                      The look of stain using chalky paint, pretty neat, huh?

If you would to see more of my projects, I regularly post to Facebook and Instagram. I would love to connect with you there!

https://www.instagram.com/robins_nesting_place/

https://www.facebook.com/Robins-Nesting-Place-333100810083404/

Tuesday, July 11, 2017

Farmhouse Grunge


I found this chest of drawers at Goodwill about two years ago. The drawers were quite snug and wouldn't open without a serious struggle. It also had a musty smell which can be common in older pieces, especially if they have been in storage.


I spent hours working on the drawers sanding and hand planing so they would open and close without catching and becoming stuck. Then it sat for several more months because I couldn't decide what to do with it. I thought about restoring it and even bought the product I wanted to use. After cleaning it and looking closely I decided that it was not in good enough condition to restore so I decided to paint it instead.

I usually like to have a pristine paint finish and have a very difficult time distressing. However on this piece I wanted to try something new for me. I wanted to do a farmhouse grunge finish. I don't even know if that is such a thing but it was what I envisioned for her!

I am a paint collector. If I ever see a neutral shade or a pretty color in the oops or mistint section I snatch it up. No matter how much paint I already have, I buy it. I think I am to the point of needing therapy for the problem! In situations like this it comes in handy though because I have paint in all shades to choose from. For this piece I selected several colors in white, off white and grays. I mixed in a chalky paint additive that I make and carry in my shop.

 To get the look I wanted I knew it would need several layers. I started dry brushing the first layer.

                                          The first application was an off white/beige color.
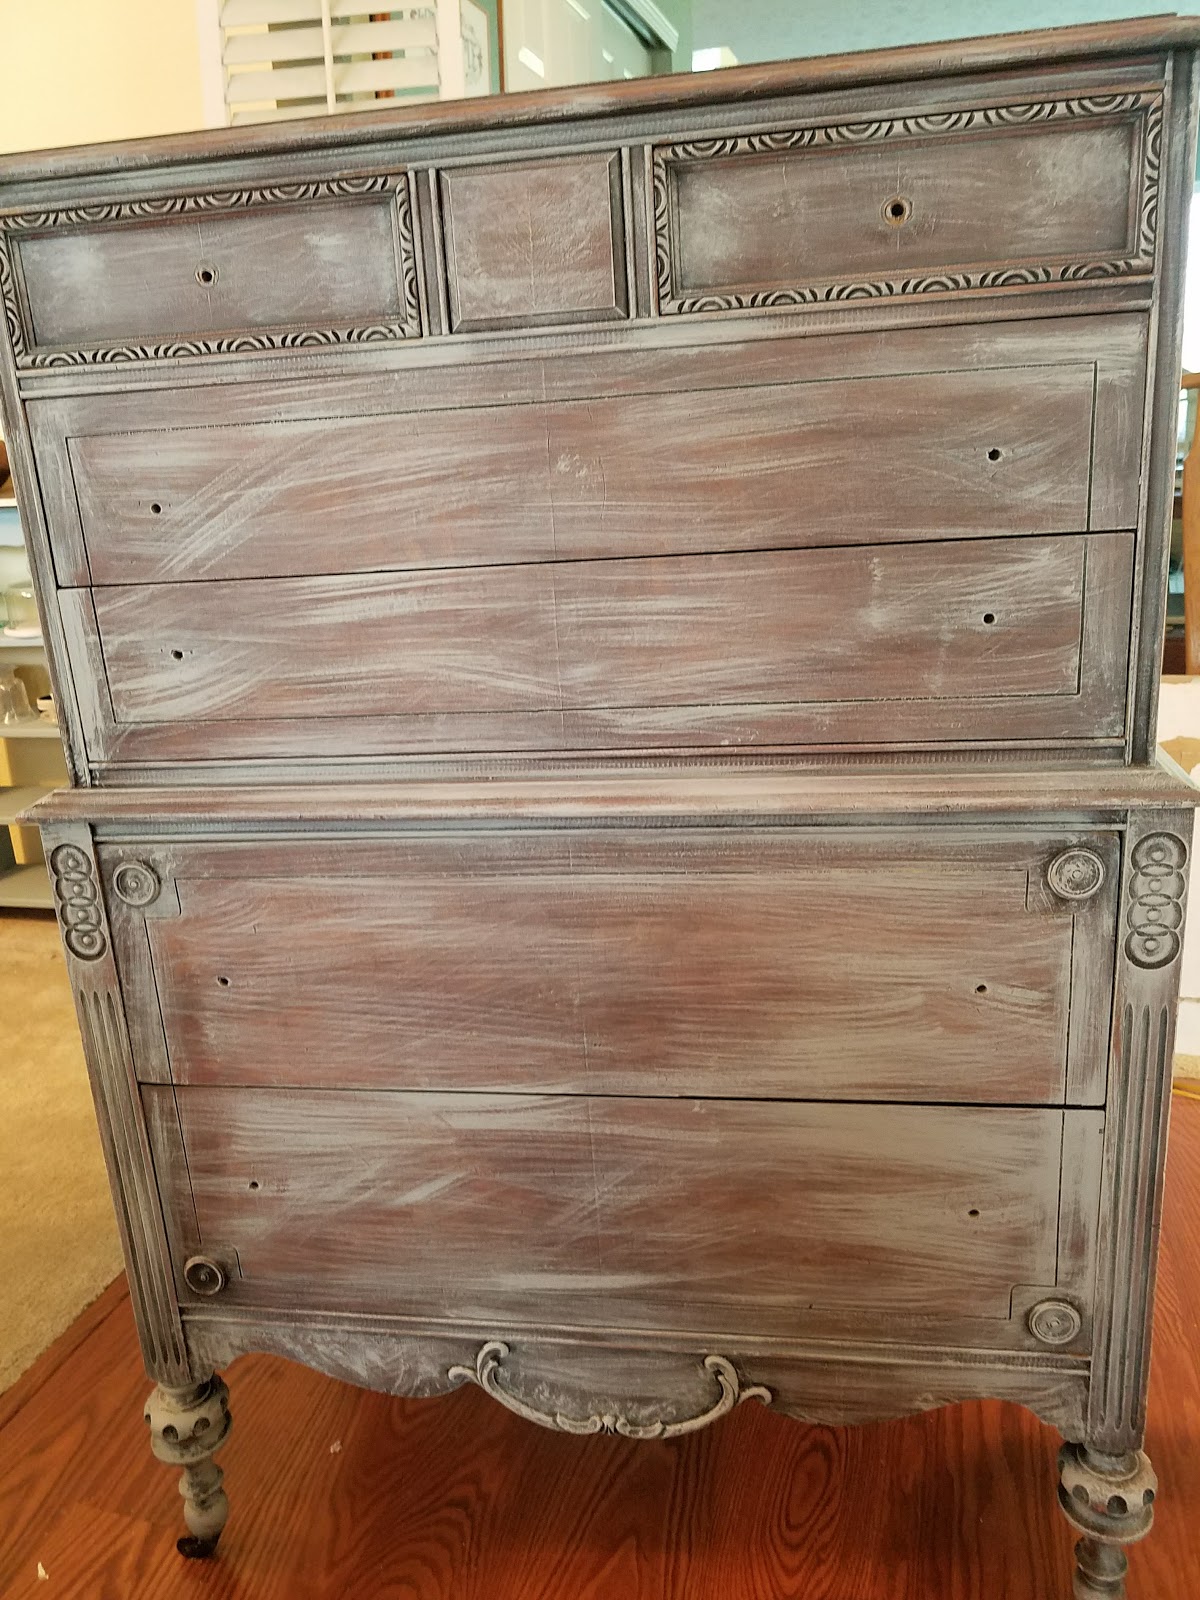
Here it is after the first layer. As you can see, it has a very light coat. I painted in different directions to give it more texture for the glazed grungy look I wanted to achieve. The good thing about dry brushing is the coats dry super fast so there is no waiting between coats on the larger pieces.

                                                      The second coat was a gray color.
                                     The third layer was kind of a "French Linen" taupe color.


                                                        This was after the third layer.


                                                     I kept repeating the first three colors.

                   If there was too much of one color I would lightly dry brush another color over it .

                                    I added a layer of General Finishes Snow White Milk Paint.

 After I got the paint layers the way I wanted, I applied a light coat of General Finishes High Performance Flat Top Coat. The top coat should be used before applying glaze to help manage it a little better.

I used a portion of an inexpensive car wash sponge from Walmart. I cut a slit to help grip the sponge. I love using these sponges for applying paint, stain and top coat. I poured a little Top Coat in a container to apply so I wouldn't contaminate the rest.

Next I applied General Finishes Black Glaze. I got a little heavy with it on the bottom and had to sand it back a little. I must have been a little too stingy with the top coat because the glaze didn't want to budge!

Crazy Indiana weather it's either too hot or too cold or too wet to work in my garage so I have to work in the house! The mess drives me nuts but as long as I have a shop I am resolved that I'm going to have projects in various stages of progress and other product scattered about. It is the nature of the beast!

Anyhoo, back to the project. Here she all finished and perfectly grungy.


 This painting technique was way out of my comfort zone and honestly there were times during this project that I was so nervous that I felt nauseous. I kept reminding myself that it was only paint. In the end I'm glad I took the risk!

You can see in this close up shot how the layers added texture to give the glaze something to grip to. If I wasn't going for the grungy look I would have not been very pleased with this much glaze. But for this piece, it was exactly what I wanted!

Next time I'll show you how I got the beautiful faux stained finish on the top!

Tuesday, August 19, 2014

Stepback Cupboard Makeover

I recently purchased this stepback cupboard. It wasn't very attractive with its red stain and thick layer of varnish but I new it had potential to be beautiful.

I always jump right into projects forgetting to take before pictures. This was taken after I had already stripped the top. Cupboards seem to be a slow sell right now, but buffets are popular and usually move quickly. I knew this piece would be great for a kitchen island, a sideboard for a T.V. or a buffet for a dining room. The top was removed and will be used in another project.

 Citristrip is an amazing product. (This isn't a sponsored post.) I wish I had taken a picture of the buffet top before I stripped it. It was so ugly with a really thick varnish. There was no wood grain showing through. It took three applications of Citristrip to remove it all. I hate to sand and with Citristrip I didn't have to.

I couldn't believe this gorgeous wood was covered up under that ugly red stain and varnish. It was so beautiful that I decided not to stain it. I only rubbed it with Howard Feed-N-Wax which left a beautiful finish. (Not a sponsored post.)


 Because I have a very tight budget, I am always checking the oops paint section when shopping at hardware stores. A few weeks ago I found a gallon of  lovely Behr paint that was almost a perfect match to a popular chalk paint color. This was a premium exterior paint with primer that I got for $5.00! I added a little Calcium Carbonate to a smaller container of paint and it went on like a dream! Amazing coverage!

Here it is again. Such a fun project! Now I need to figure out what to do with the cupboard. Any ideas?

Saturday, August 9, 2014

Hot Pink Cutie!

I got this vintage Sears French Provincial desk at a garage sale a few weeks ago. It obviously had been used as a makeup vanity and years of makeup were caked on it. It was so dirty.


It got a thorough scrubbing inside and out.

It had dirty wallpaper stuck inside the drawer that I could not remove. I remembered seeing a handy tip on Pinterest about removing wallpaper with fabric softener. The tip was 1:1,one part fabric softener to one part water. I didn't measure, I just put water and softener in a spray bottle.


I peeled the top layer off the wallpaper and generously sprayed the drawers. 


I was amazed at how easily it scraped off. My daughter also used this technique to remove the wallpaper border in the house they just purchased. She first tried a commercial product which didn't work well at all. It was a piece of cake to remove the border with this stuff!

Another plus was the wonderful fragrance from the fabric softener masked the smell of the old makeup and musty drawers.

At the vendor mall where I work, I had been overhearing little girls talking to their moms about wanting hot pink in their rooms. So I knew I wanted a touch of hot pink on the desk. I painted all of the drawers pink and the desk a lovely creamy white. The quality of this picture isn't good due to the lighting. I've got to remember to get pictures of items in better lighting before I put them in my space!

Here it is again! 


This little cutie only lasted a few days in the shop before it went home with a little princess!

Next time, let's talk paint! I have some tips that will save you time and money!


Friday, August 8, 2014

Kind of the Same but Different

I started Robin's Nesting Place in April 2007. I was a homeschooling, stay at home mom who had just begun learning photography. I had a passion for gardening and nature and this was a place to share those hobbies.


My life is quite different now. My children have graduated our homeschool and are happy, busy adults. I started working over two years ago in the neatest vendor mall in our small town. About a year ago I obtained a small space of my own to sell my photography cards and repurposed  items.

I haven't had much time or energy to blog and, honestly, I've been trying to figure out what direction to take this blog. Previously, most of my followers have been garden bloggers, many whom I still follow on Facebook and care about. But...I am no longer the passionate gardener I once was. In fact my yard is a wreck and to continue on in the same vein would be impossible for me now.


It is always difficult to decide how much to share of one's personal life on a blog but a bit of sharing is necessary to gently guide this beloved blog of mine to the path that I am now on so that we are in sync together once again.


Those who have followed me for a long time know that my husband was in an industry hit very hard by the economic downturn. You know that he had a few layoffs, but I never shared the extent of this. My husband lost six jobs in less than seven years. I know, it's hard for me to believe this could happen to anyone as well. How is that even possible?

 His first layoff was after being happily employed for over fifteen years with a wonderful recreational vehicle company, (it no longer exists). The next job lasted almost three years before he was told they could no longer afford to keep him. He was well known and well liked in his industry and another company quickly created a position just for him. Six months later they had to cut costs and let him go,(it no longer exists) . Once again he quickly got another job this time in a different industry, (medical sales). He was there about two years before they drastically cut their sales force to a bare minimum, and once again he was unemployed. This company no longer exists as well. Another, and yet another devastating layoff. Six in less than seven years!

With his career in absolute shambles and now unemployable to most companies, my dear husband spent several months unemployed. At this point, his MBA and his previous success mattered very little to anyone. Thankfully, about two years ago, he had a wonderful friend who took him under his wing and gave him a new business opportunity. It has taken a while for him to be educated in this new field and get established and things are finally gaining momentum. I feel like I can finally breath again. I think we are going to make it!


Why am I telling all of this to you? It offers a little explanation for my lengthy absence, (I've been in survival mode), and because it has a lot to do with the direction of this blog. I've learned a lot during these last few years. I've learned how to survive unemployment six times over. I've learned how to live on the bare minimum. I've lived through some of the darkest days of my life and survived. I've been the wife of a man who has faced devastating loss time and time again and our marriage survived! The stress and pain of unemployment is unique and isolating. It isn't really talked about much. I have a lot I want to say about it, I'm just not sure if I want to do it at Robin's Nesting Place, but if I decide to, now you are prepared.


I just want to start blogging again! What will Robin's Nesting Place look like now? It will be kind of the same, but different. I am no longer just a "garden blogger". I paint furniture now for my little shop and I want to share the before and after pictures. I enjoy being creative and making things, I want to share that process. I still enjoy photography and I will continue sharing my pictures, hopefully they will still bring pleasure and joy to others along the way. For the most part it will remain a hobby blog that I will tie into my little shop. At this point, I don't really know how Robin's Nesting Place will evolve from here, but I hope you will be along on this journey with me and hopefully be blessed and inspired along the way!


Thank you for reading and following Robin's Nesting Place!