Thursday, December 27, 2012

Homemade Suet Recipe


 Once again a few people have asked me for my suet recipe. I posted about my suet in April 2010, so I will just do a quick re-post of that.

I don't use an exact recipe and I don't measure my ingredients. I add different things depending on what I have on hand at the time. Usually when the corn meal, flour, raisins or oats get close to expiring I save them for suet. As long as you use the lard and peanut butter for the base you really can't mess it up.

For this batch I used:

One small tub of lard
2 jars of natural peanut butter that had become hard, (I poured off some of the oil)
corn meal
9 grain bread flour, (you can use any kind of flour)
oatmeal
about 2 tablespoons of sugar
sunflower seeds
raisins
crushed egg shells, ( I save the shells from boiled eggs and put them in the freezer for spring suet)

I melt the lard and peanut butter on the stove on low heat. Once it is blended, I add the dry ingredients mixing and pouring until it is the texture I want. I spread it into a large cookie sheet and let it cool in the refrigerator. Once it has cooled and is firm, I cut it into squares that will fit the suet cages.

Here is the basic recipe that I started with from Julie Zickefoose:


Peanut Butter Suet Dough from Julie Zickefoose

1 cup peanut butter
1 cup lard
Combine and melt these two in the microwave, in the oven, or over very low heat on the stovetop. Remove from heat and stir in:

2 cups plain yellow cornmeal
2 cups quick oats
1 cup flour

Allow to cool and harden, then chop into chunks and store at room temperature in jars. Serve crumbled in a shallow dish.
 
Julie recommends that you only feed the birds this suet during the winter months. I still feed them suet in the spring and include the crushed egg shells for added calcium.

Here is another great resource for suet recipes. As the website shows, you can add all kinds of ingredients to make suet.

Wednesday, December 26, 2012

Of Blizzards and Birds


Indiana had our first major snow storm of the winter season today. We were under a blizzard warning but most of the major snow and wind was south of me! We only had about four or five inches of snow and thankfully no one in my family had to venture out!

A few weeks ago I wrote about a new winter bird feeding station for a Lowe's Creative Ideas project. Since we had snow in the forecast, I went outside yesterday and replaced some of the food on the tree. It had been warm and rainy and some of the homemade suet had started molding and smelled sour.  I added more suet dipped pine cones and a few lights and ornaments to the tree. I also washed the tiny clay pots and put plain peanut butter in them.

Usually when it snows the birds gather at my feeders in large numbers and I wanted the tree to be ready for them!
It is beautiful flocked with snow!
  I took the pictures through my sliding glass doors that looked like this most of the day! There was also blowing snow that made getting good pictures even more difficult!

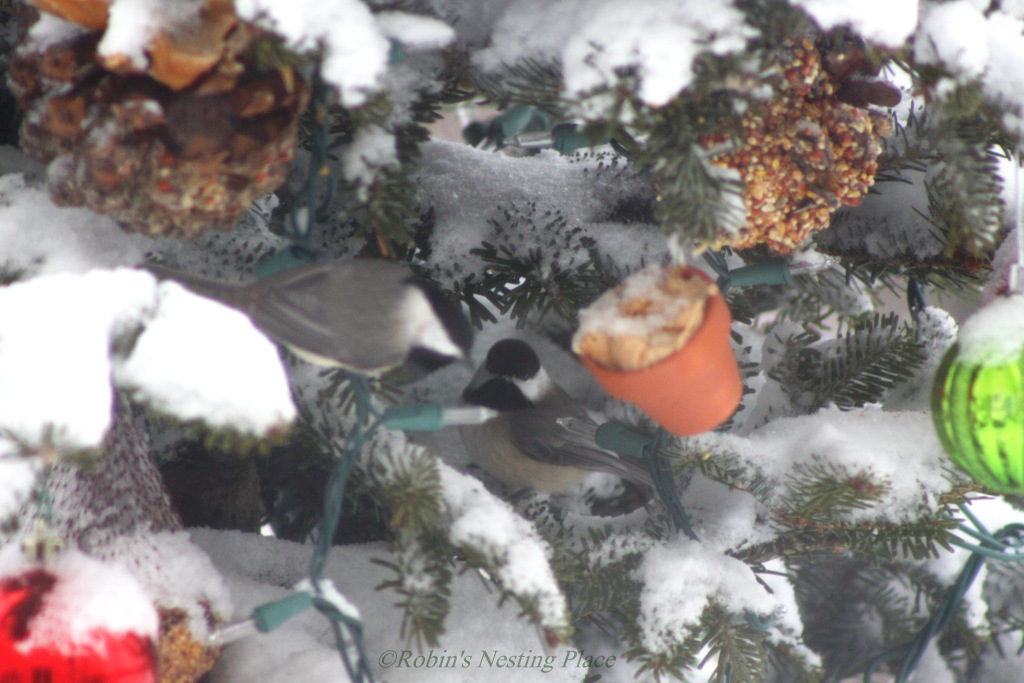
 Even though the pictures are not the best quality, I wanted to show the birds that landed on the tree today. It was such a joy to watch them so close to the house!

 The little chickadees are my favorites and they were in and out of the tree all day!

 I was thrilled when they started eating the peanut butter from the clay pots! I was glad that I took the time to wash and refill them on Christmas day!
 The dark-eyed juncos also frequented the tree once they figured out how to maneuver the branches. They are usually ground feeders. 

 I had several mesh bags saved in the pantry and hung a few of them on the tree with home made suet bars in them.
 The chickadees came to the same spot all day and conveniently feasted on suet and peanut butter!
 Here is a female dark-eyed junco eating seeds from the suet dipped pine cone.

 The chickadees also ate seeds from the pine cones.

 Juncos are very difficult to photograph, especially on cloudy days because their eyes are so hard to capture. I don't like bird pictures if I can't clearly see their eyes so these were heavily photoshopped to lighten them enough to see the eyes.

 Same with the little chickadees and their black caps and dark eyes.

 I put a few more lights on the tree yesterday and finally plugged them in. I couldn't wait to see the lights twinkling in the snow and the sweet little birds on the light covered tree.

 I found out this morning that my sweet and cautious husband had unplugged the lights and brought the extension cord inside. He thought it might be hazardous to have lights on in the snow if the high winds blew the tree over. Better safe than sorry, but I was disappointed that I didn't have the lights on in these pictures of the precious chickadee.

The woodpecker landed on the back side of the tree and was also difficult to capture. I'm hoping once he is comfortable landing on the tree that he will venture to the front side!


The robins were in the yard in large numbers devouring the berries from the Bradford and Cleveland pear trees.

A few months ago I read that cardinals eat pumpkin seeds. I love cardinals, especially in the winter and since seed is so expensive I try to save and be frugal however I can! So, rather than throw the pumpkins in the composter, I busted them open and left them on the ground. It isn't very attractive and several times I have looked out the window and regretted that decision. I no longer do! This is a terrible picture, but it is proof that they will eat the seeds! Hopefully more people will save their fall pumpkins for the cardinals during these snowy winter months when their food supply is more scarce! I'm hoping to catch them eating it again when the weather conditions are more favorable.
 I hope everyone is safe today after the severe weather down south yesterday and the winter storms up north today! It has definitely been an eventful two days of crazy weather!

And I wanted to wish you all a belated...


I hope that you were all blessed to be with those you love!

Also a huge thank you to Shirley from Shirls Garden Watch blog for mentioning Robin's Nesting Place on her blog! Shirl and I both have a fondness and fascination for the birds!

Monday, December 17, 2012

Easy Felted Arm & Wrist Warmers

Here is a fun winter project that pretty much anybody can do! Chance are you already have everything you need to do this already in your home! All you need is a sweater that is at least 80% wool!

 I wanted to make a felted wool quilt so I had been collecting sweaters at Goodwill for months. After cutting my quilt squares, I hated to waste so much of the wonderful felted wool. So I decided to make arm and wrist warmers from the sleeves! Here are a few that I've made!


(These have already been sold to a friend!)


There are so many ways to embellish and dress them up! They are practical and cute and really help keep your arms and hands warm and leave the fingers free for typing and texting!


My daughter was sweet to play hand model for me when she dropped by after work today!

These are the first pair of wrist warmers I made! I wear them to work and I love them!

I like making them so much that I decided to sell them at them vendor mall where I work!

There is something comforting and cozy about working with felted wool! To felt the wool, you wash the sweaters in very hot water with laundry detergent and dry on high heat. Some sweaters will have to be washed twice to felt properly. Beware, it is very messy! After washing the sweaters you will have clumps of fibers in the washer and on the sweaters. I just look over the sweaters and pick off the clumps before drying them. I am saving the loose wool to put in the garden next spring for the nesting birds! Because the fibers come off of the sweaters, I only wash one sweater at a time or if they are very similar in color I will wash them together.

Felting the wool causes the fibers to become very tight so you can cut it without concern that it will unravel. I use a blanket stitch especially around the thumb hole mainly for reinforcement.


You still have time to make a pair as a gift for Christmas or for yourself for winter!

Wednesday, December 5, 2012

Starlings


The invasion of starlings is like a scene from a horror movie! They descend by the thousands and the noise of their arrival is unmistakable! It is difficult to describe the sound that thousands of birds make as they land on your roof and surrounding land. It is quite eerie to say the least!


My neighbor's roof was covered but they quickly flew away as I rounded the corner to get a picture. I usually shoo them away, even resorting to banging a spoon on a pan to make noise.

We have many Bradford and Cleveland pear trees in our neighborhood and the berries are consumed by the starlings. A large flock of them will land on a tree and withing minutes it is stripped of the berries.

Photo taken 2011
From
The robins also eat the berries. They will stay in our area all winter as long as they have food. I have a robin here and she has been protecting her tree by chasing away any bird that lands in it. Of course she can't chase away thousands of starlings. I'm glad I was home to help protect her tree!

After the starlings eat their fill or rather, after they consume everything in their path, they fly off leaving their corrosive, red berry droppings all over houses and cars. Oh, how I loathe them!

Robin

Monday, December 3, 2012

Forcing Bulbs and Winter Gardening


Winter months can be difficult for those of us who love to garden and nurture plants. Lowe's has asked me to tell how I bring the garden indoors to continue my gardening hobby during the winter months.

One way I continue gardening during the winter months is to force bulbs. It is a great way to have cheerful and colorful spring flowers in the dead of winter! Although the last few days have felt like spring! I am happy to have winter delayed!


There are several bulbs that can be easily forced inside. One of the easiest to force is paper white narcissus but you can also force crocus, hyacinths and tulips.


I bought this crocus bulb starting kit for .50¢ at a garage sale a few years ago. You just add water and before long you can see the roots start growing!


A paper white surrounded by hyacinths.
Another container of paper whites. They are growing faster in this one; I'm not sure why.

For the paper whites and hyacinths, you add a layer of rocks and keep just enough water to wet the bottom of the bulb.


This ladle attached to a cutting board has just enough room for two small paper white bulbs.
A small remnant of burlap makes a very simple bow to cover the nail.

As you can see, a variety of containers can be used to force bulbs
Really, anything can be used as long as it doesn't have drainage holes.
Another way to bring the garden in is to add natural elements. I love to add greenery and pine cones around the house, not just for Christmas, but all winter. I picked up some free greenery at Lowe's Saturday and I'll show you how I use it both indoors and out!


Thank you so much for reading! 

Robin